COCKATIELS
FAMILY NAME: CACATUIDAE
LENGTH: 12in (30cm)
DISTRIBUTION: Australia
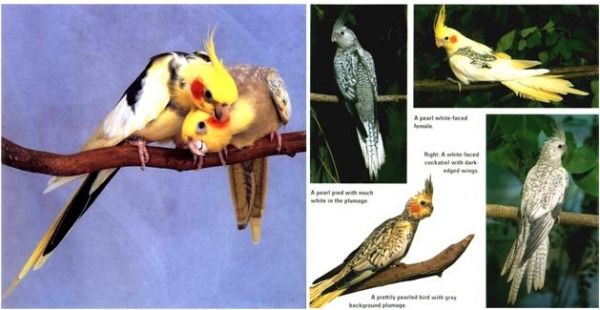
COLOR VARIANT AVAILABILITY: Very many varieties avialable
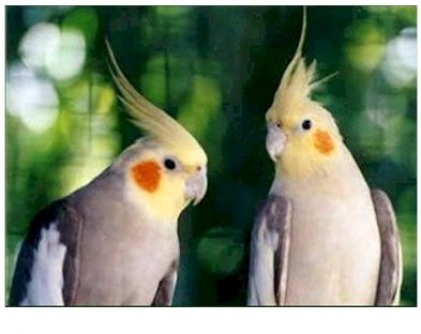
COMPATIBILITY: Social by nature
PET POTENTIAL: Excellent. Young birds develop into long-lived, tame, talkative companion.
DIET: Bird seed mix, comprised of millets and plain canary seed, groats and
sunflower. Greenstuff, Carrot and Apple.
HEALTH PROBLEM: Chicks vulnerable to candidiasis. Adults susceptable to roundworm.
BREEDING TIPS: Most satisfactorily if housed individually rather than in colonies.
NESTING NEEDS: 9in square x 12in deep, with a generous lining of coarse wood shaving on the
base.
TYPICAL CLUTCH SIZE: 5 - 6 eggs
INCUBATION: 19days
REARING REQUIREMENTS: Provide softfood for breeding birds to raise protein intake. Also soaked seed.
FLEDGING: Young Birds will leaved the nest at about 5 weeks old, and will be independent
by 6 weeks.
LIFESPAN: Individual have lived for up to 30 years
FIRST STEP…
Selecting your birds. Good health is the most important thing to look for when choosing your birds for breeding. Healthy birds breed healthy chick’s, this is your ultimate goal so a little thought needs to go into deciding whether or not a bird is suitable to breed. Age is the next most important factor to consider. Birds will breed at a very young age but usually the results are disappointing and it can affect their future breeding success. It is far better to be patient, wait those extra few months and don't allow your birds to breed until at least 12 months of age. In the long run you will have far better breeding results and the birds will benefit by not being overworked too early.
Many people who want to start breeding make the mistake of thinking their pet bird will make a good breeding bird. They think all they have to do is buy a bird of the opposite sex and stand back. Unfortunately it doesn't work that way. While some pet birds will go on to become good breeding birds most will not. Usually they are too imprinted on their human mates to ever accept a bird as their new partner. This then becomes a bit of a disaster and if it has been your first introduction to breeding it can be very off putting. I really think it is best to keep your pet birds as pets and if you decide you want to start breeding buy yourself a pair of suitable birds.
Not all birds are compatible so it is a good idea to give your birds a chance to get acquainted before you introduce the breeding box to them. Otherwise the hens will most likely start to lay eggs before the cock bird is ready and you will only achieve lots of clear eggs. It is very important that both the cock and the hen are in sequence with their breeding routine. The correct order of events would be that the pair become bonded by being together, after you feel confident that they are fairly well bonded introduce the nesting box , the cock bird should then work the box i.e.. Chew all around the hole, go inside and rearrange the shavings, and only when he is satisfied he has it as it should be will he let the hen go in the box. In the meantime mating should have been taking place and all being well within a very short time you should see the first egg appear. They may not start to sit until after the third egg has been laid, then they will take turns with the cock bird sitting all day and the hen sitting all night. There will always be slight variations to this as every bird is different but generally speaking if all the above procedures have taken place you are well on your way to achieving your first nest.
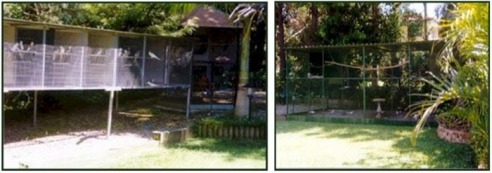
Because cockatiels are quite prolific breeders they really need a reasonable amount of room in which to breed. While your breeding pair may look to have plenty of room in a small cage just picture how crowded it will get when 5 or 6 chicks fledge. A flight approximately 2 metres long and 1 metre wide will give your birds a bit of room to move. In the case of suspended aviaries, 1 meter high or conventional 2 meters high. If you can go bigger fine but if space is a problem this is an adequate size for one breeding pair. Location of the aviary can also affect your breeding success. Your birds need a certain amount of peace and quiet in order to go about their business of sitting eggs and raising chicks.
They can't do this if they are constantly being disturbed by kids, dogs, cats, other birds or anything that distracts them from their job. Obviously there are certain things that are out of our control.
NEST BOX
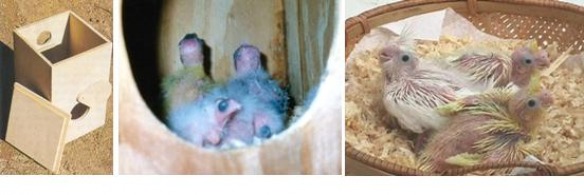
The standard nesting box for a pair of cockatiels is 10inches high x 10inches wide x 20inches deep. The entrance hole should be 2inches in diameter and be 2-3 inches from the top of the box with a piece of doweling for perching. If it is smaller the birds will sometimes refuse to enter. Suitable material should be placed in the bottom i.e., wood shavings. The positioning of the box can be quite important. It needs to be in a position where the birds can feel quite safe and relaxed about going to nest. If you have set your birds up but they won't go anywhere near the box chances are they don't like something about where you have put it and the best idea would be to change it to a different position.
The box should be minimum 10”X10” square and 18” high. A 2” across, round entrance hole should be cut about 3” from the top of the box with a perch under it going through to the inside allowing the birds to perch both inside and outside the nest box.
An inspection hatch is a great idea and can be either at the back (see picture) or the side, whichever is more convenient to where the box is situated. Just make sure that the hole is large enough to get your hand into and at least 3” from the bottom of the box.
This allows for regular inspection of the eggs and chicks and should be done on a regular basis and at about the same time each day so that the birds get used to the idea. They will hiss and try to chase you away but don’t let that faze you as it is a necessary part of breeding and might prevent things getting out of hand should something go wrong.
Keep in mind that breeding birds become extremely protective of their box and an otherwise tame bird will usually become a little terrorist while breeding. This usually goes back to normal when breeding is over again.
Place untreated pine wood shavings into the bottom of the box to a depth of about 2”. Then hang the box or put it on a shelf as high as is practical in the aviary. Make sure you are able to inspect it without taking it down though as this will cause much less stress to the birds than having to take the box down each time you want to look into it. Put another dish of water into the aviary for them to bathe in.
This should be a shallow wide container, like a pot plant saucer or pie plate. During the incubation period it is important for the hen to be able to keep up the humidity to the eggs so they don’t dry out. She will know just how the conditions should be and will bathe before sitting on the eggs if they need more moisture.
Some bonded pairs react immediately to having a nest box put into the aviary. With others it can take a few weeks, but if all the above conditions are met then they should start mating within a week if they are not already doing so.
The cock bird will inspect the nest and does a certain amount of renovations to it. He will usually chew around the opening and rearrange the bedding. Sometimes they even throw out a lot of the bedding material. Then when the hen is satisfied with it she will accept it and start spending time in there.
Start your regular inspections at this early stage even though there is nothing to see in there so that the birds become used to it being a regular part of the nesting process.
FEEDING
Now is the time to start increasing your bird’s food supply to allow them to build up in preparation for the upcoming chicks. Also as we all know how finicky cockatiels can be, if they haven't previously had access to a variety of foods they will have time to get used to them before the chicks arrive. Multigrain bread is a very good, convenient way to provide your birds with a quick way to fill up their chicks. Sprouted seed is also very good, wheat; mung beans etc soaked for a few hours drained and allowed to sprout slightly, rinsed thoroughly and presented to your birds will always be well received. It is also a good idea to sprinkle a vitamin supplement i.e.. Vionate over the sprouts or bread to give your birds extra vitamins and minerals. Greens such as kangkong and sikwa are great. Sweet corn, carrot or whatever your birds enjoy.
Of course it goes without saying a good supply of quality seed, fresh water and calcium in the form of cuttlefish bone must be always available. You may get a bit of wastage at this stage but as soon as the chicks start to hatch you will be kept busy running backwards and forwards with extra supplies to help your birds feed their demanding babies. Obviously any left over food must be removed and discarded every day. At this time it is very important to provide your birds with their soft foods and vegetables early in the morning as this is when they are busy feeding the chicks, so forget about sleeping in as your birds will be hanging on the wire watching for your arrival. It is a good idea if possible to top up their supplies of grains, seeds and soft food later in the day as well as they go into the feeding frenzy to fill the chicks up for the night.
The more effort you are prepared to put in at this stage can make all the difference between your birds sailing through with 5 or 6 healthy chicks or struggling along with some of the chicks failing through lack of food and maybe only 1 or 2 of the strongest surviving. The parent birds also suffer greatly if they have to try and feed their chicks on limited resources.
HATCHING
If you are familiar with your bird's behavior it is pretty easy to tell when the chicks are near to hatching. More rapid changeovers start to take place as the hen will emerge more often to feed and also to bath so that she can go back in to the nest wet and create some humidity so that the egg shells are not too hard and dry thereby making it more difficult for the chicks to hatch Around 21 days from when the first egg was laid little chips start appearing in the surface of the egg as the chick prepares to emerge. Nothing beats the sight of that little ball of fluff rolling around in the nest, however it is important to give your birds some space and don't be tempted to interfere too much with the chicks at this stage. As long as everything is going well a quick look while the parents are out feeding should be enough.
Depending how many chicks hatch you may have to assess if there is too greater distance in age the smallest chick may need assistance either by supplementary feeding or moving to another nest where like sized chicks are. Ideally the chicks are all of a comparable size and receive equal amounts of food from the parents. Daily inspections are a good idea as the chicks progress just to keep an eye on them and to act quickly if any problems arise. Normal healthy chicks should have empty crops first thing in the morning and should quickly be filled up by the parents and then topped up throughout the day until late in the afternoon if you get a look at them should have lovely crops chock a block full to get them through the night Then the process starts all over again the next day. A healthy chick should have good skin color i.e. a nice healthy pink, should be quite bright and able to hold its head up high to be fed. If you want to put leg rings on the chicks around day 10 is usually the time, this can vary a bit from chick to chick.
They can't do this if they are constantly being disturbed by kids, dogs, cats, other birds or anything that distracts them from their job. Obviously there are certain things that are out of our control.
NEST BOX
The standard nesting box for a pair of cockatiels is 10inches high x 10inches wide x 20inches deep. The entrance hole should be 2inches in diameter and be 2-3 inches from the top of the box with a piece of doweling for perching. If it is smaller the birds will sometimes refuse to enter. Suitable material should be placed in the bottom i.e., wood shavings. The positioning of the box can be quite important. It needs to be in a position where the birds can feel quite safe and relaxed about going to nest. If you have set your birds up but they won't go anywhere near the box chances are they don't like something about where you have put it and the best idea would be to change it to a different position.
The box should be minimum 10”X10” square and 18” high. A 2” across, round entrance hole should be cut about 3” from the top of the box with a perch under it going through to the inside allowing the birds to perch both inside and outside the nest box.
An inspection hatch is a great idea and can be either at the back (see picture) or the side, whichever is more convenient to where the box is situated. Just make sure that the hole is large enough to get your hand into and at least 3” from the bottom of the box.
This allows for regular inspection of the eggs and chicks and should be done on a regular basis and at about the same time each day so that the birds get used to the idea. They will hiss and try to chase you away but don’t let that faze you as it is a necessary part of breeding and might prevent things getting out of hand should something go wrong.
Keep in mind that breeding birds become extremely protective of their box and an otherwise tame bird will usually become a little terrorist while breeding. This usually goes back to normal when breeding is over again.
Place untreated pine wood shavings into the bottom of the box to a depth of about 2”. Then hang the box or put it on a shelf as high as is practical in the aviary. Make sure you are able to inspect it without taking it down though as this will cause much less stress to the birds than having to take the box down each time you want to look into it. Put another dish of water into the aviary for them to bathe in.
This should be a shallow wide container, like a pot plant saucer or pie plate. During the incubation period it is important for the hen to be able to keep up the humidity to the eggs so they don’t dry out. She will know just how the conditions should be and will bathe before sitting on the eggs if they need more moisture.
Some bonded pairs react immediately to having a nest box put into the aviary. With others it can take a few weeks, but if all the above conditions are met then they should start mating within a week if they are not already doing so.
The cock bird will inspect the nest and does a certain amount of renovations to it. He will usually chew around the opening and rearrange the bedding. Sometimes they even throw out a lot of the bedding material. Then when the hen is satisfied with it she will accept it and start spending time in there.
Start your regular inspections at this early stage even though there is nothing to see in there so that the birds become used to it being a regular part of the nesting process.
FEEDING
Now is the time to start increasing your bird’s food supply to allow them to build up in preparation for the upcoming chicks. Also as we all know how finicky cockatiels can be, if they haven't previously had access to a variety of foods they will have time to get used to them before the chicks arrive. Multigrain bread is a very good, convenient way to provide your birds with a quick way to fill up their chicks. Sprouted seed is also very good, wheat; mung beans etc soaked for a few hours drained and allowed to sprout slightly, rinsed thoroughly and presented to your birds will always be well received. It is also a good idea to sprinkle a vitamin supplement i.e.. Vionate over the sprouts or bread to give your birds extra vitamins and minerals. Greens such as kangkong and sikwa are great. Sweet corn, carrot or whatever your birds enjoy.
Of course it goes without saying a good supply of quality seed, fresh water and calcium in the form of cuttlefish bone must be always available. You may get a bit of wastage at this stage but as soon as the chicks start to hatch you will be kept busy running backwards and forwards with extra supplies to help your birds feed their demanding babies. Obviously any left over food must be removed and discarded every day. At this time it is very important to provide your birds with their soft foods and vegetables early in the morning as this is when they are busy feeding the chicks, so forget about sleeping in as your birds will be hanging on the wire watching for your arrival. It is a good idea if possible to top up their supplies of grains, seeds and soft food later in the day as well as they go into the feeding frenzy to fill the chicks up for the night.
The more effort you are prepared to put in at this stage can make all the difference between your birds sailing through with 5 or 6 healthy chicks or struggling along with some of the chicks failing through lack of food and maybe only 1 or 2 of the strongest surviving. The parent birds also suffer greatly if they have to try and feed their chicks on limited resources.
HATCHING
If you are familiar with your bird's behavior it is pretty easy to tell when the chicks are near to hatching. More rapid changeovers start to take place as the hen will emerge more often to feed and also to bath so that she can go back in to the nest wet and create some humidity so that the egg shells are not too hard and dry thereby making it more difficult for the chicks to hatch Around 21 days from when the first egg was laid little chips start appearing in the surface of the egg as the chick prepares to emerge. Nothing beats the sight of that little ball of fluff rolling around in the nest, however it is important to give your birds some space and don't be tempted to interfere too much with the chicks at this stage. As long as everything is going well a quick look while the parents are out feeding should be enough.
Depending how many chicks hatch you may have to assess if there is too greater distance in age the smallest chick may need assistance either by supplementary feeding or moving to another nest where like sized chicks are. Ideally the chicks are all of a comparable size and receive equal amounts of food from the parents. Daily inspections are a good idea as the chicks progress just to keep an eye on them and to act quickly if any problems arise. Normal healthy chicks should have empty crops first thing in the morning and should quickly be filled up by the parents and then topped up throughout the day until late in the afternoon if you get a look at them should have lovely crops chock a block full to get them through the night Then the process starts all over again the next day. A healthy chick should have good skin color i.e. a nice healthy pink, should be quite bright and able to hold its head up high to be fed. If you want to put leg rings on the chicks around day 10 is usually the time, this can vary a bit from chick to chick.
All being well your chicks will start to fledge at around 4 weeks of age. Usually you can see them peeking out of the hole a few days beforehand. They usually drop back out of sight when they see anybody coming. Finally they will take the big plunge, sometimes with a helping shove from Mum or Dad. Once they are out of the box the parent birds start the long process of teaching them how to eat by themselves. This is fascinating to watch as the parent birds fly backwards and forwards encouraging the chicks. However the chicks are still dependant on the parents for around another 4 weeks and care should be taken not to remove them too early as they may not be weaned and able to feed themselves. The parents birds will usually start to lay again as soon as the first nest of chicks start to fledge and the whole process starts again.
Shared by: Joselito "Lito" Palacio - CAS Member
Glenn Quisido - CAS Member
Shared by: Joselito "Lito" Palacio - CAS Member
Glenn Quisido - CAS Member
